
Complete Guide to Setting Up iSCSI Shared Storage with Ubuntu Server and Windows Client
Guide, 3, december, 2024
This guide walks you through setting up an iSCSI target on an Ubuntu server and connecting a Windows machine as an iSCSI client. The process includes configuring the iSCSI service, preparing the disk, and connecting it to Windows. This setup is optimized for single-client use to avoid data corruption.
Prerequisites
- Ubuntu Server with an additional disk (
/dev/sdb1) ready to use. - Windows 10/11 machine as the client.
- Optional but recommended: Tailscale installed for secure access.
- Sudo privileges on the Ubuntu server.
Step 1: Prepare the Disk on the Ubuntu Server
Check if the additional disk is available:
lsblk
Ensure the disk is not mounted and has no active partitions.
Create a new filesystem (ext4):
sudo mkfs.ext4 /dev/sdb1
Create a mount point and mount the disk:
sudo mkdir -p /mnt/shared_storage
sudo mount /dev/sdb1 /mnt/shared_storage
Add the disk to /etc/fstab for automatic mounting at startup:
echo "/dev/sdb1 /mnt/shared_storage ext4 defaults 0 0" | sudo tee -a /etc/fstab
Step 2: Install and Configure TGT for iSCSI
Install the TGT package:
sudo apt update
sudo apt install tgt -y
Create an iSCSI target configuration file:
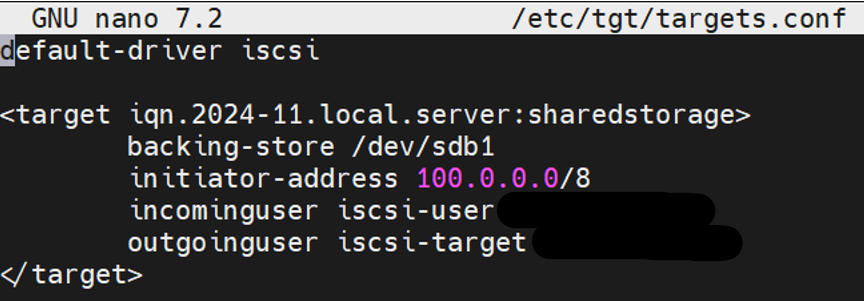
sudo nano /etc/tgt/conf.d/iscsi.conf
Add the following content:
<target iqn.2024-11.local.server:sharedstorage>
    backing-store /dev/sdb1
    initiator-address 100.0.0.0/8
    incominguser iscsi-user StrongPass123
    outgoinguser iscsi-target AnotherPass456
</target>
Restart the TGT service to load the configuration:
sudo systemctl restart tgt
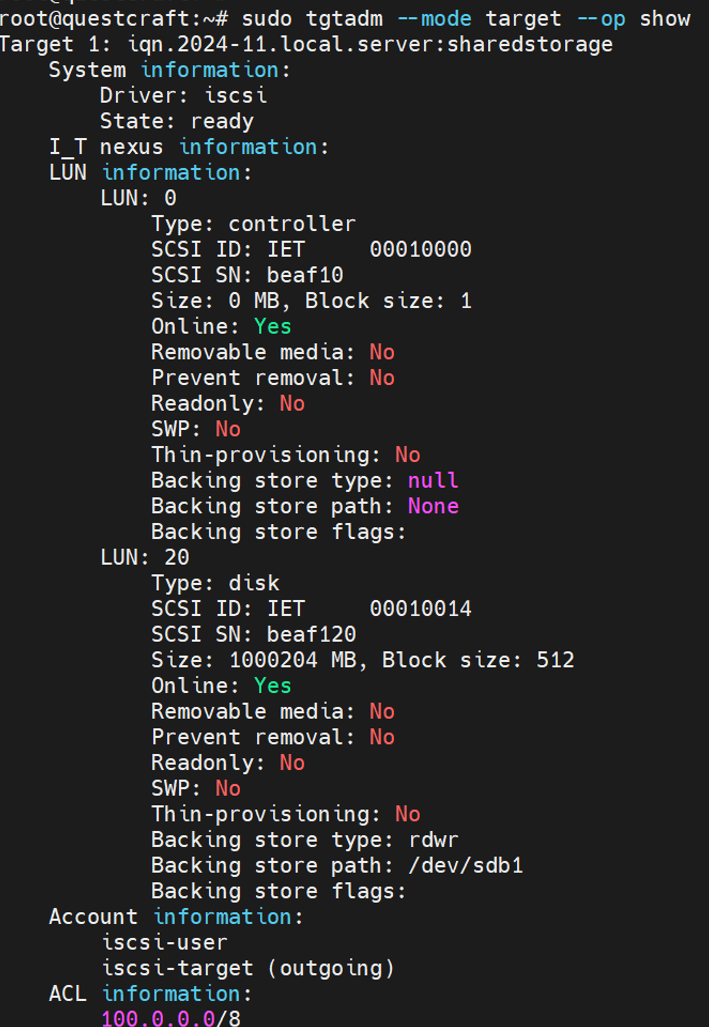
Verify the iSCSI target status:
sudo tgtadm --mode target --op show
Ensure the LUN is configured correctly: If LUN 0 is set to controller, add another LUN:
tgtadm --mode logicalunit --op new --tid 1 --lun 20 --backing-store /dev/sdb1
Verify the LUN is configured as a disk.
Step 3: Connect to the iSCSI Target from Windows
Open the iSCSI Initiator on Windows:
- Press Win + S, search for iSCSI Initiator, and open the tool.
- If prompted to enable the service, click Yes.
Discover the iSCSI target:
- Go to the Discovery tab and click Discover Portal.
- Enter the Tailscale IP address of your Ubuntu server (e.g.,
100.x.x.x) and click OK.
Connect to the iSCSI target:
- Switch to the Targets tab.
- Select the target (e.g.,
iqn.2024-11.local.server:sharedstorage) and click Connect. - In the Advanced settings:
- Enter the CHAP credentials:
- Username:
iscsi-user - Password:
StrongPass123
- Username:
- Click OK to connect.
- Enter the CHAP credentials:
Detect the disk:
- Go to the Volumes and Devices tab.
- Click Auto Configure to detect the new disk.
Step 4: Initialize and Format the Disk in Windows
Open Disk Management:
- Press Win + R, type
diskmgmt.msc, and press Enter.
Initialize the disk:
- A pop-up should prompt you to initialize the new disk.
- Select GPT (GUID Partition Table) and click OK.
Create a new volume:
- Right-click on the unallocated space and choose New Simple Volume.
- Follow the wizard to format the disk with NTFS.
- Assign a drive letter (e.g.,
D:) and label the disk (e.g., SharedStorage).
Verify the disk is accessible:
- Open File Explorer (Win + E) and ensure the new disk is listed.
Optional: Automatically Reconnect at Startup
- Open the iSCSI Initiator and navigate to the Targets tab.
- Select your target and click Properties.
- Check the option Add this connection to the list of Favorite Targets.
- Click OK.
Important Notes
- Single-client only: Do not connect multiple machines to the same iSCSI target without a cluster filesystem, as it can cause data corruption. For multi-client access, consider using NFS or SMB.
Conclusion
You have successfully set up iSCSI shared storage between an Ubuntu server and a Windows client. The disk behaves like a locally attached storage device on the Windows machine.
Tip: This setup can also be used for high-speed external storage, such as for storing Xbox games via iSCSI.